简介
继 使用 Sourcery 进行模板编程(meta编程) 之后,发现有很多类似的地方,同样有用脚本生成代码的需求。
例如:
- 配置 Json 文件,可以直接生成json文件
- Theme Json 文件,可以直接生成json文件
- 打点 Json 文件等
那使用的好处是什么呢:
- 可以避免在项目运行时cup和内存的大量消耗,例如 Theme.json,会导致应用在启动时候的大量消耗
- 可以确保不同端的使用相同的数据,例如 事件打点,又例如 配置文件,如果 Android 和 iOS 能使用同一个仓库,那么就能够清楚的看到各个项目的各个功能的开启和关闭。
例如有一个 base,android,ios 三个json文件在,最终生成了Swift 和 Kotlin 可直接调用的方法。这样即可。
先看一下,最终生成的文件大概像这样:
1
2
3
4
5
6
7
8
9
10
11
12
13
14
15
16
17
18
19
20
21
22
23
24
25
26

//=======================================================================
//
// This file is computer generated from Localizable.strings. Do not edit.
//
//=======================================================================
// swiftlint:disable valid_docs
// swiftlint:disable line_length
public enum Strings {
/**
 "A little extra to help bring this project to life."
 - **en**: "A little extra to help bring this project to life."
 - **de**: "Ein kleines Extra, um dieses Projekt zu veröffentlichen."
 - **es**: "Algo extra para ayudar a que este proyecto se pueda realizar."
 - **fr**: "Du soutien supplémentaire pour faire vivre ce projet."
 - **ja**: "プロジェクトを実現させるための追加支援。"
*/
public static func A_little_extra_to_help() -> String {
  return localizedString(
    key: "A_little_extra_to_help",
    defaultValue: "A little extra to help bring this project to life.",
    count: nil,
    substitutions: [:]
  )
}
...
或者这样:
1
2
3
4
5
6
7
8
9
10
11
12
13
14
15
16
17
18
19
20
import UIKit
extension UIColor {
  /// 0xA12027 black
  /// 0xA12027 white
  public static var ksr_alert: UIColor {
    return .hex("ksr_alert")
  }
  ...
}

extension UIFont {
  /// largeTitle
  ///
  ///     (family: "...", size: 36.0, weight: "Regular")  black
  ///     (family: "...", size: 24.0, weight: "Semibold")  white
  public static var title: UIFont {
    return .font("title")
  }
  ...
}
总之,需要生成的文本可以是多种多样的,看你想要的是什么样的。
本文就依托一份 Theme 的 Json 文件的代码生成介绍一下。
使用 Sourcery 进行模板编程(meta编程)是对于枚举等其他现行的 swift 类,可以通过脚本的方式添加扩展,例如枚举的
allCase。
参考的 OSS 项目 github.com/kickstarter/ios-oss
关于 Xcode Command Line
本文讨论的是使用 swift 编写脚本,所以免不了会使用 Xcode。
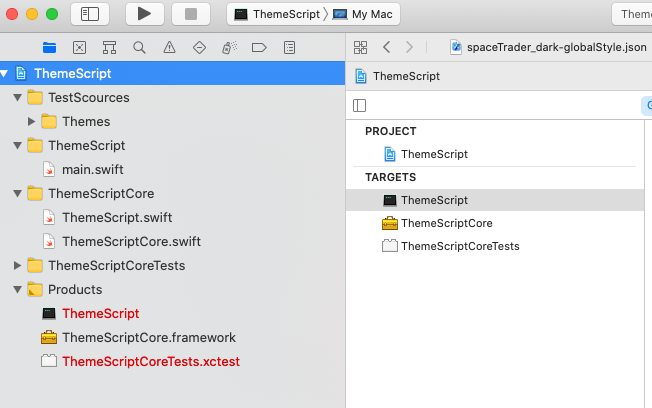
New -> macOS -> Command Line Tool 即可创建一个 Command Line Tool,创建完成大概是这样:
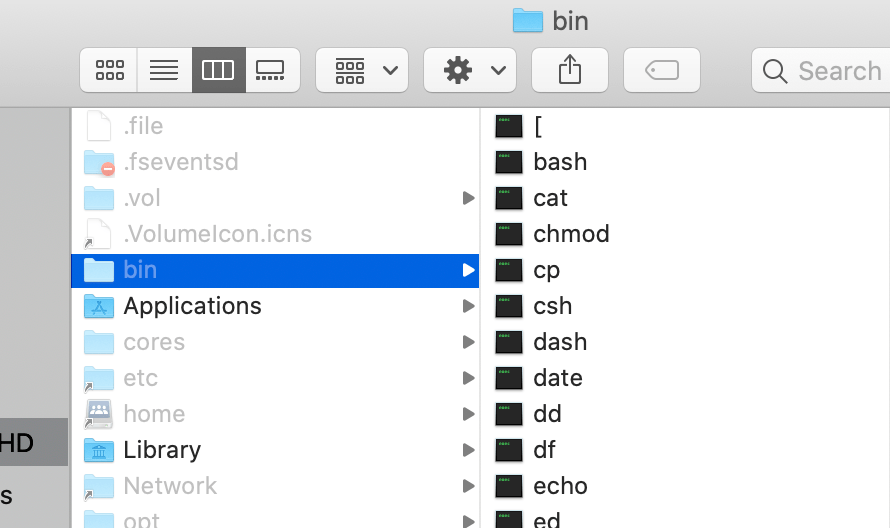
而 build 完成最终生成的文件是像 /bin/ 的所有可执行文件一样:
关于 achieve
虽然使用 debug 的 build 就能够正确运行脚本,但是,为了规范化,还是讲一讲 achieve 的问题。
archive 跟 debug 的可执行文件有些不同:
- debug版本,如果依赖其他 target 那么其他 target 需要打包并且放到同一文件夹才能使用;archive 版本则不需要
- release 版本有一个特殊的文件
Package.swift来支持打包,稍后介绍
debug 使用 Xcode Run 即可,但是 release 版本就需要使用 Package.swift 和一个打包命令了:
swift build -c release
关于 Swift Packages
例如上边图片的那个那个工程:
1
2
3
4
5
6
7
8
9
10
11
12
13
14
15
16
17
.
├── Package.swift
├── README.md
├── Tests
│   ├── LinuxMain.swift
│   └── ThemeScriptTests
│       ├── ThemeScriptTests.swift
│       └── XCTestManifests.swift
├── ThemeScript
│   └── main.swift
├── ThemeScript.xcodeproj
├── ThemeScriptCore
│   ├── Info.plist
│   ├── ThemeScript.swift
│   └── ThemeScriptCore.swift
└── ThemeScriptCoreTests
    └── ThemeScriptCoreTests.swift
那么它的 Package.swift 大概是这样的:
创建大概是主要
- 在项目目录使用
swift package init --type executable创建 - Xcode 退出工程,双击
Package.swift打开,修改里面的内容
1
2
3
4
5
6
7
8
9
10
11
12
13
14
15
16
17
18
19
20
21
22
23
24
25
26
27
28
29
30
31
32
33
34
// swift-tools-version:5.3
// The swift-tools-version declares the minimum version of Swift required to build this package.

import PackageDescription

let package = Package(
    name: "ThemeScript",
    // products: [
    //     // Products define the executables and libraries a package produces, and make them visible to other packages.
    //     .library(
    //         name: "ThemeScript",
    //         targets: ["ThemeScript"]),
    // ],
    dependencies: [
        // Dependencies declare other packages that this package depends on.
        // .package(url: /* package url */, from: "1.0.0"),
    ],
    targets: [
        // Targets are the basic building blocks of a package. A target can define a module or a test suite.
        // Targets can depend on other targets in this package, and on products in packages this package depends on.
        .target(
            name: "ThemeScript",
            dependencies: ["ThemeScriptCore"],
            path: "ThemeScript"),
        .target(
            name: "ThemeScriptCore",
            path: "ThemeScriptCore"),
        .testTarget(
            name: "ThemeScriptCoreTests",
            dependencies: ["ThemeScriptCore"],
            path: "ThemeScriptCoreTests"),
    ]
)
Package.swift 主要是清晰的标记除了依赖关系,并且给出相应的path。
swift.org/package-manager developer.apple.com/documentation/swift_packages
编写脚本代码
开始编写脚本大概像下边:
- 检查脚本所处的文件路径,根据相对位置找到 json 文件
- 解析json文件,生成相应的字符串文件
- 将字符串文件写入相应的位置
其中最重要的属于解析json和生成对应的文件了。那就先介绍一下脚本路径的问题,随后再讨论数据处理。
路径
通过产量脚本传入的参数即可知道脚本的位置在哪里。
1
2
3
4
5
6
7
public final class ThemeScript {
    private let arguments: [String]

    public init(arguments: [String] = CommandLine.arguments) {
        self.arguments = arguments
    }
}
传入的第一个参数 self.arguments.first 就是脚本所在的位置,然后你就可以拼接不同的参数 /BaseUI/Themes.swift 进行计算了最终位置了。
PS : 也可以对其他不同的参数进行检查,如果参数不对就 print help信息:
1
2
3
4
5
6
7
8
9
10
11
12
13
14
func checkVaild() {
    guard self.arguments.count >= 1 else {
        print("Check arguments failed.")
        print("""
            Plase use one or more argument for this script.
            `themescript path`
            `themescript path inputpath.json outputpath.swift`
            `themescript path inputpath.json inputpath.json outputpath.swift`
            `themescript path inputpath.json inputpath.json outputpath.swift`
            ...
            """)
        return
    }
}
字符串数据处理
这部分是解析字符串到模型,然后在输出字符串,所以会包含比较多的细节,所以就不贴太多代码了,主要看下思路。
public let themes: [(String, [AnyHashable:Any])]
- 将所有数据解析成为
[(String, [AnyHashable:Any])]这样的 key-vaule 结构。
key 用来记录当前的 theme 的名字。 [AnyHashable:Any] 用来记录内部的所以的值,font,color,double之类的
-
在合适的地方打上log,即可通过log查看脚本的运行进度
-
还有就是对生成代码的一些优化:
- 使用注释标记,让它更清晰
- 适时 sort 一下,可以让最终的结果更加的清晰。
- 一些测试代码
还有如果你的 json 文件是相互引用的,通常要先预处理一下文件
&& 这样就能生成像文章开头一样的文件了:github.com/kickstarter/ios-oss/blob/master/Library/Strings.swift
最后
本文只是介绍了 Swift Command Line 的冰山一角,实时上,你可以做更多的事情,例如写一些其他的脚本:
- 用脚本进行图片压缩,拼接
- 用脚本进行项目依赖下载
- 用脚本进行新电脑的配置,下载安装软件,环境配置等
例如写了一个专门 format 博客文章的脚本,后续可以加入创建博客 init post之类的入口。
为了修正博文源码中的注释和其他的脚本
希望能给大家一点启示。觉得好的可以去 github 赞一个。