简介
除了之前看过的书,记录下了 Swifter tips,现阶段对 Storyboard 使用也比较深入了,记录一些 Storyboard 的 Tips。
Swift 开发必备 tips 阅读笔记 第一篇,Swift 语言的新特性。
Swift 开发必备 tips 阅读笔记 第二篇,Objective-C 与 Swift 的一些特性过渡。
Swift 开发必备 tips 阅读笔记 三 最后一篇,Swift与开发环境及一些实践。
使用了一段时间的 Storyboard,记录一些使用,方便以后查阅。
本文就不讨论优劣好坏,只是多一些实用的技巧。
Constant
一个典型的例子:当键盘升起的时候, 被遮挡的 View 需要向上移动。这个时候就需要修改 constant 来适应高度了
1
2
3
4
5
6
7
8
9
10
11
12
13
14
15
16
17
18
19
20
21
class ViewController: UIViewController {

    @IBOutlet weak var c: NSLayoutConstraint!
    override func viewDidLoad() {
        super.viewDidLoad()
        // Do any additional setup after loading the view.

        NotificationCenter.default.addObserver(self, selector: #selector(keyboardWillShowNotification), name: UIResponder.keyboardDidChangeFrameNotification, object: nil)
    }


    @objc func keyboardWillShowNotification(_ notif: Notification) {
        print("🧩--\(notif.userInfo)\n--🧩--\(Date())--\(#function)--\(#line)🧩")

        guard let size = notif.userInfo?[UIResponder.keyboardFrameEndUserInfoKey] as? CGRect else {
            return
        }
        c.constant = size.height
    }

}
Priority
这个通常用来处理有多个相似约束的取舍问题。
例如界面顶部上有一个可有可无的控件,当有的时候就需要整个界面向下空出距离。
除了设置上面控件(可有可无的那一个)的height,一种更好的做法是使用优先级来区分:
- 约束1,距顶部 priority = 500
- 约束2,距view priority = 250
这样就可以通过设置约束2的 priority 进行快速的调整UI了
1
c.priority = view.isHidden ? .defaultLow : .defaultHigh
这样写的好处是没有 height 的修改,所以就不会有具体的 hard-code 的值的存在。同时如果 view 是自适应 contnet 的话也不受影响
1
2
3
4
5
6
7
8
9
10
11
12
13
14
15
16
17
18
19
20
21
extension UILayoutPriority {

    @available(iOS 6.0, *)
    public static let required: UILayoutPriority

    @available(iOS 6.0, *)
    public static let defaultHigh: UILayoutPriority // This is the priority level with which a button resists compressing its content.

    public static let dragThatCanResizeScene: UILayoutPriority // This is the appropriate priority level for a drag that may end up resizing the window's scene.

    public static let sceneSizeStayPut: UILayoutPriority // This is the priority level at which the window's scene prefers to stay the same size.  It's generally not appropriate to make a constraint at exactly this priority. You want to be higher or lower.

    public static let dragThatCannotResizeScene: UILayoutPriority // This is the priority level at which a split view divider, say, is dragged.  It won't resize the window's scene.

    @available(iOS 6.0, *)
    public static let defaultLow: UILayoutPriority // This is the priority level at which a button hugs its contents horizontally.

    @available(iOS 6.0, *)
    public static let fittingSizeLevel: UILayoutPriority // When you send -[UIView systemLayoutSizeFittingSize:], the size fitting most closely to the target size (the argument) is computed.  UILayoutPriorityFittingSizeLevel is the priority level with which the view wants to conform to the target size in that computation.  It's quite low.  It is generally not appropriate to make a constraint at exactly this priority.  You want to be higher or lower.
}
StackView
当有同一组 UI 的时候可以方便的通过不同方式进行排列,StackView 提供了非常多的排列方式。
- 居上,中和下
- 内容,等宽,等间距…
- 支持 content
- 支持 remove
尤其是支持 remove 让它在一些地方使用起来非常方便。
ScrollView
& StackView
有一些界面,看起来像 Table,但是却是确定的本地数据,数量也就三五个,不妨试试 ScrollView & StackView。
直接上图吧,看一下它的魅力:
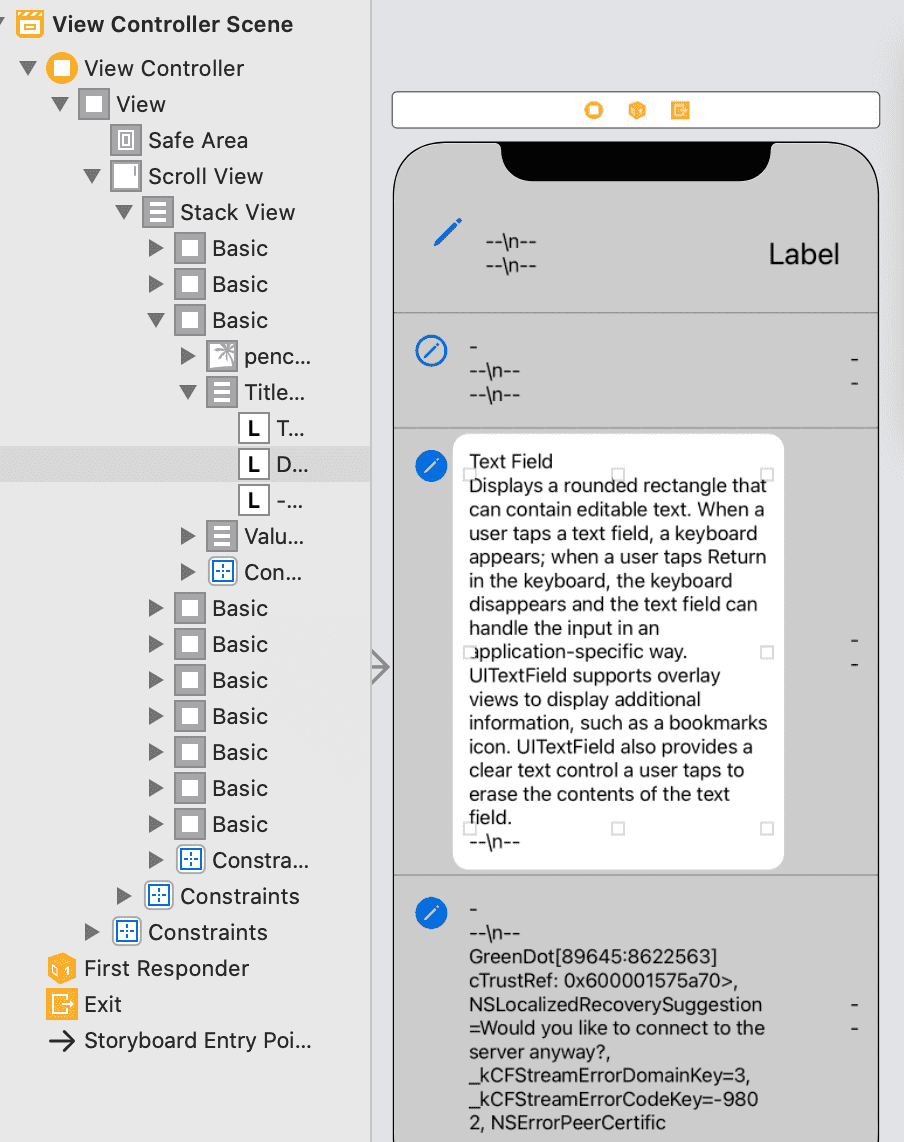
Table-Cell
- 拖 Cell 到 Tableview 里面。
- 填写 class name。
这样带来了一些好处:
- 在 Table 中嵌套 Cell 可以有效的减少项目文件个数。
- 省区去了注册cell的代码。
1
2
3
4
5
6
7
8
9
10
11
12
13
14
15
16
17
18
19
20
21
22
23
24
25
26
class TestCell: UITableViewCell {
    @IBOutlet weak var titleL: UILabel!
}

class ViewController: UIViewController {
    @IBOutlet weak var tableV: UITableView!

    override func viewDidLoad() {
        super.viewDidLoad()
        tableV.reloadData()
    }
}

extension ViewController: UITableViewDataSource {
    func tableView(_ tableView: UITableView, numberOfRowsInSection section: Int) -> Int {
        return 3
    }

    func tableView(_ tableView: UITableView, cellForRowAt indexPath: IndexPath) -> UITableViewCell {
        guard let cell = tableView.dequeueReusableCell(withIdentifier: "TestCell", for: indexPath) as? TestCell else {
            return UITableViewCell()
        }
        cell.titleL.text = "documents?.documentStatements?[indexPath.row].title"
        return cell
    }
}
Segue
使用 Storyboard 的好处之一是可以直观的看到页面的层级结构,为了让页面之间能互相传递数据,就要用到 Segue 了。
- `+, 新建 VC
- 在旧的 VC 右键按钮,然后选择第一项
action, 然后链接新的 VC - 设置 Segue 的
identifer
使用 Segue 来准备页面跳转所需要的数据。
1
2
3
4
5
6
7
8
override func prepare(for segue: UIStoryboardSegue, sender: Any?) {
        super.prepare(for: segue, sender: sender)
        if segue.identifier == "Home",
            let headerVC = segue.destination as? HeaderVC {
			homeLockEvent = HomeLockEvent()
            headerVC.delegate = self
		}
}
Container View
除了直接跳转,还有一种方式是引用 vc(其他的 Storyboard 上) 的 view。
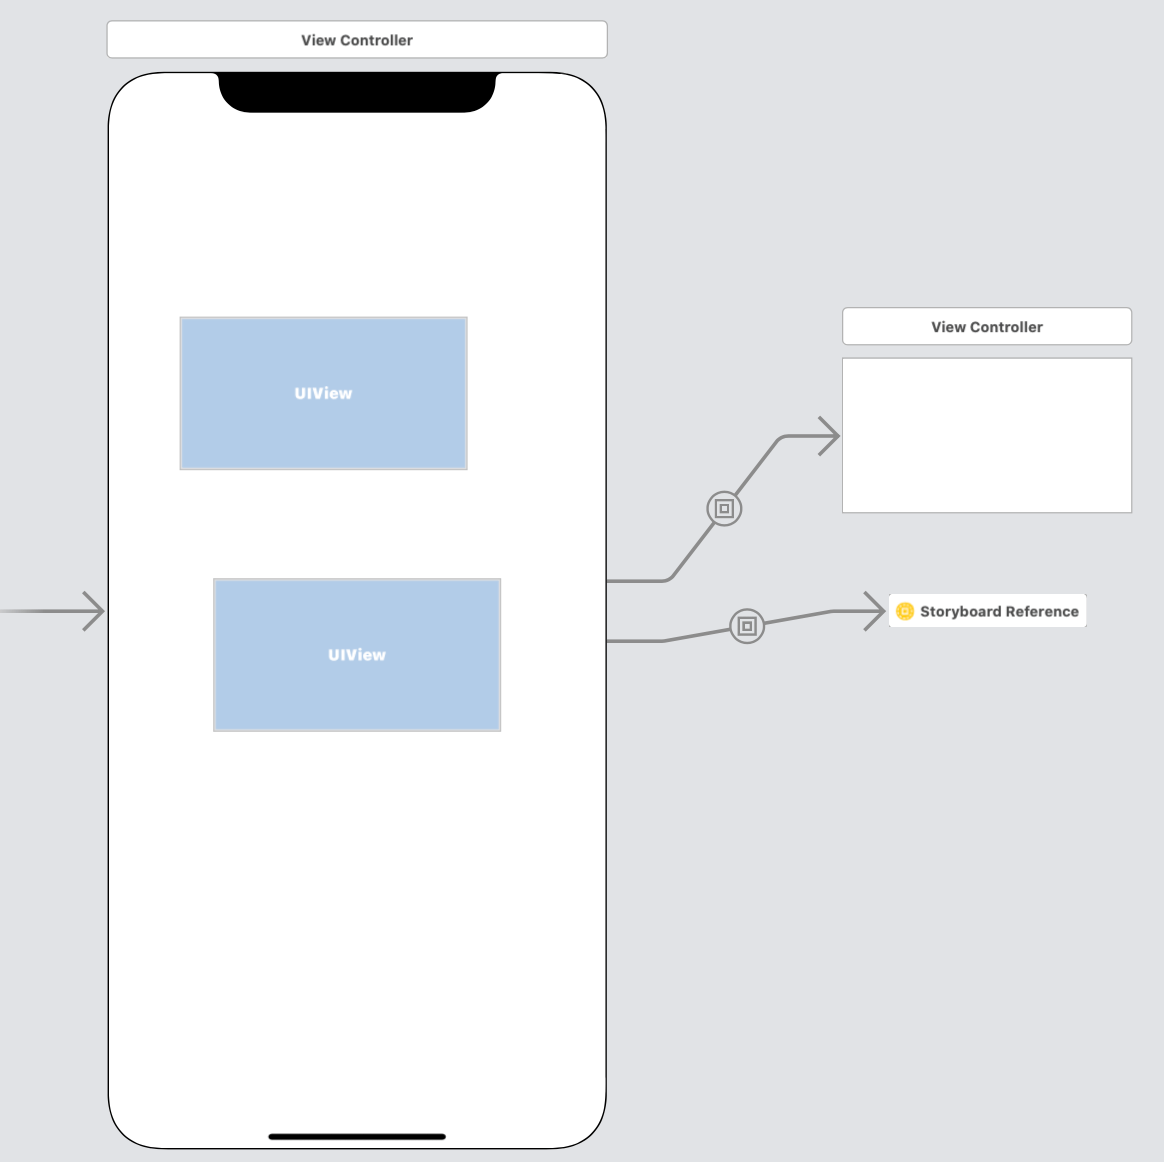
使用 ViewController
+, 新建 Container View
这样就会默认创建一个引用 VC View 的 Embed segues。
使用 Storyboard
+, 新建 Storyboard+, 新建 Container View- 删除原有的链接,删除默认创建的 VC, 最后添加 Storyboard 的链接
这样就会默认创建一个引用 Storyboard View 的 Embed segues。
使用 @IBDesignable
当一个UI类添加了 @IBDesignable 标记之后就可以在 storyboard 上使用了,通过给添加 class name 即可。
PS: 这个UI类如果添加了@IBDesignable标志,就需要提供相应的 initializer 方法:
1
2
3
4
5
6
7
8
9
10
//MARK: - Initializers -
public override init(frame: CGRect) {
      super.init(frame: frame)
      setupUI()
  }

  public required init?(coder aDecoder: NSCoder) {
      super.init(coder: aDecoder)
      setupUI()
  }
除了类之外,还可以给属性扩展,例如给 view 添加阴影(可惜不能通过xib看到):
1
2
3
4
5
6
7
8
9
10
11
12
13
14
15
16
17
18
19
20
21
22
23
24
25
26
27
28
29
30
31
32
33
34
35
36
37
38
39
40
41
42
43
44
45
46
47
48
49
50
51
52
53
54
55
56
57
58
59
60
61
62
63
64
65
66
extension UIView {

    //cut irrelevant code for SO Question

    @IBInspectable
    var masksToBounds: Bool {
        get {
            return layer.masksToBounds
        }
        set {
            layer.masksToBounds = newValue
        }
    }


    // Shadow handling
    @IBInspectable
    var shadowColor: UIColor? {
        get {
            if let color = layer.shadowColor {
                return UIColor(cgColor: color)
            }
            return nil
        }
        set {
            if let color = newValue {
                layer.shadowColor = color.cgColor
            } else {
                layer.shadowColor = nil
            }
        }
    }

    @IBInspectable
    var shadowOpacity: Float {
        get {
            return layer.shadowOpacity
        }
        set {
            layer.shadowOpacity = newValue
        }
    }


    @IBInspectable
    var shadowRadius: CGFloat {
        get {
            return layer.shadowRadius
        }
        set {
            layer.shadowRadius = newValue
        }
    }

    @IBInspectable
    var shadowOffset: CGSize {
        get {
            return layer.shadowOffset
        }
        set {
            layer.shadowOffset = newValue
        }
    }


}
使用工具栏
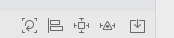
工具栏提供了很多方法,从左到右依次是:
- 更新 frame 到约束
- 添加两个或者多个View的相对约束
- 修改一个View的约束
- 将 View 放置到其他容器中,View(Scroll,View,Stack)VC(Nav,Tabbar)
总结
这些是使用过程中,一些方便的点,希望能够帮助到看到这篇文章的人。